Friday, June 28, 2013

Saute Vegetables with White Bean Mash


I was in the book store one day looking through some cooking magazines trying to get some ideas when I ran across a recipe that I thought looked really good.  I really didn’t want to buy a magazine for 1 recipe so I read it a few times in hopes that I would remember it enough to be able to cook it.  You guessed it, I didn’t remember it when I got home.  I only remembered some of the ingredients so I had to make up the rest.  That is how this recipe came about.


Ingredients:
½ red bell pepper, sliced
½ green bell pepper, sliced
½ small onion, sliced
1 small zucchini, sliced
2 cloves garlic, minced
1 tbsp olive oil
1 can  cannelloni beans, drained
1 can butter beans, drained
Juice from ½ lemon
Salt and pepper to taste

In a pot add the cannelloni beans and butter beans to warm.

Meanwhile, in another pan add olive oil, garlic, red and green bell peppers and onion.  Saute for about 5-7 min.  Add in zucchini and lemon and saute for another 3-5 min.


Once beans are warmed mash, with a potato masher or with a mixer, until creamy.  You may need to a tbsp of water at a time if too thick.  

Place a large spoonful on the plate and add the sauteed vegetables on top.

Salt and pepper to taste.

**In these pictures I used a different variety of butter beans because that is what I had on hand at the time. so the pictures may look a little different than how yours will turn out.


Tuesday, June 25, 2013

Kickin' Kale Chips

You like them. You love them. You want to eat some more.  


Kale Chips

In recent years, kale has gained in popularity.  And, there is no better way to consume kale than in the form of kale chips.  Find your perfect recipe and soon you'll be doubling and tripling the recipe to always have them on hand.  

Presented below is a recipe that I've worked on for awhile.  Initially, I started preparing kale chips coating only with oil, sprinkling with salt and baking in a low temperature preheated oven.  I've come a long way since those days, using a dehydrator and attempting to capture a melody of sweet and spice and everything nice.  

Here's my favorite recipe....which I affectionately call Kickin Kale Chips


Ingredients:
1 bunch of kale (de-vein, chop and scrunch)
2 tbsp coconut oil (melted)
1 tbsp lemon juice
2 tbsp honey
1/4 tsp salt
2 drops liquid smoke
1/4 tsp smoked paprika
1/2 tsp chili powder
1/8 tsp red pepper
2-3 cloves garlic (minced)


Combine all ingredients in a large mixing bowl
Place kale into the bowl
Work with your hands until all pieces of kale are coated
Place kale in a single layer on a plate covered with a paper towel and let sit for a couple minutes to remove any excess liquid
Move kale into a dehydrator tray in a single layer

Dehydrate at 160 for an hour then lower to 135 for 12 hours or until crunchy.

Friday, June 21, 2013

Peppery Squash Chips


Today, we have another dehydrator post.  This one features a warm weather favorite yellow squash.


Ingredients:

1 medium yellow squash
1/2 tbsp olive oil 
salt
pepper
small food brush

Slice squash extra thin
Place slices in a single layer 
Brush each slice with a dab of olive oil
Salt and pepper
Turn over each slice and repeat
Place in a single layer on a dehydrator sheet
Dehydrate until crunchy (About 6-8 hours at 160)


Monday, June 17, 2013

Banana chips and a couple of her friends....

We've all seen the marketing of the super fit person, standing atop a mountain, snacking on granola and dried fruit.

However, few of us in our adult life have a level of cardiovascular activity to justify eating the high sugar content in most prepackaged dried fruits.  Sure, our kids may reach those activity levels but even then we don't want them mindlessly snacking on sugar laden dried fruits.

Here's my solution....


Dehydrated banana, pear and apple chips:

Here's what you need:
  • Lemon juice 
  • Apples
  • Bananas
  • Pears
  • Dehydrator

Pour the lemon juice in a mixing bowl; about 1 cup.

Peel, core and slice the apples and pears

Peel and slice the bananas

Place fruit into the lemon juice and let sit for about 4-5 minutes.  I typically work with the apples and pears first, letting them sit in the lemon juice while I peel and slice the balance.  With the bananas you will want to work quickly, placing them in the lemon juice as soon as possible.

Drain from the lemon juice and place on a dehydrator tray.


Start dehydrating at 145 or higher for the first two hours.  Then reduce the temperature to 135 and continue dehydrating for 12-24 hours depending on how much 'crunch' you desire. 


Friday, June 14, 2013

Smoky Eggplant


As promised, here is another dehydrator recipe to help you battle the summer heat by not having to preheat your oven.  This one focuses on eggplant; specifically the most commonly found large, egg-shaped purple eggplant.  

Fun facts about eggplant:  

  • Closely related to potatoes and tomatoes. 
  • Classified as a nightshade.
  • Often used as a meat substitute in vegan and vegetarian cooking
  • Is delicious

Ingredients:


2 cloves garlic, minced
1 eggplant, sliced horizontally and salted (After slicing place the eggplant in a single layer and salt lightly, this will aid in combatting the natural moisture of the eggplant.)
1/4 cup olive oil
2 tbsp tamari sauce
2-3 drops of liquid smoke
1 tsp chili powder
1/4 teaspoon cinnamon 
2 tsp maple syrup


In a large mixing bowl, combine all ingredients. 

Dredge the eggplant through the mixture, lightly coating both sides. Careful to let any excess drip off. 

Place into dehydrator in a single layer. 


Dehydrate at 135 for approximately 8-12 hours; until desired crispiness. 


Smoky eggplant makes a great vegetarian option to bacon.  Crumble it up and place atop salads.  Use it on a vegetarian style BLT.  Get creative!  

Tuesday, June 11, 2013

Coconut Cinnamon Balls

When the heat and humidity of summer arrives, a dehydrator is one alternative to an oven for food preparation and snacks. 

A food dehydrator removes moisture from food, aiding in preservation.  The appliance accomplishes this by using a heat source and air flow.  Dehydrators come in a range of options and price points.  They are readily available from a variety of brick n mortar retailers, as well as online.   

I'm using a Nesco American Harvest dehydrator.  With the humidity peaking in the southeast, my dehydrator has been in use all weekend.  So, expect several dehydrator recipes in the coming weeks.  

The first in the series of dehydrator recipes is Coconut Cinnamon Balls, 
inspired by the popular Larabar.  These balls are a great snack option for so many reasons; they are vegan, and gluten free, as well as nut free.  These snacks don't require refrigeration; so they are great to keep in the car, purse or desk drawer.   

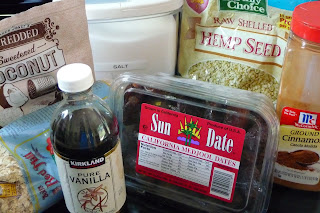
Dates are the basis for these coconut balls.  If you haven't used dates before, you will be surprised at their natural tastiness.  They are packed with antioxidants, naturally sweet, a great source of fiber and provide many minerals such as calcium, magnesium, zinc, manganese, copper, iron, selenium and potassium.  Many refer to dates as nature's candy. 

The version presented below is in ball (versus bar) form.  This was only to save time.  The same recipe can be spread into a square pan on parchment paper.  If you choose the bar method, I recommend refrigerating the pan for a couple hours prior to scoring into bars and placing in the dehydrator. 

Ingredients:

1/4 cup hemp seeds
1/2 cup rolled oats 
1 tsp cinnamon
pinch of sea salt
1 cup pitted dates
2 tbsp shredded coconut
1/2 tsp vanilla


Place the hemp seeds, rolled oats, sea salt and cinnamon into a blender or food processor. Work them until the ingredients are chunky like shown below:


Add the dates and vanilla to the mixture.  Continue to process until a ball forms.  Then toss in the coconut shreds, processing for 15-30 seconds additional. 

Remove mixture and form into balls.

Place into a dehydrator.  Dehydrate at approximately 135 for 8-12 hours.  


This recipe leaves itself wide open for variations.  Not a coconut fan? Leave it out.  Have a love of pistachios?  Toss some in during the final 15-30 seconds. 

If you discover or already have a favorite combination, leave us a comment.  The dehydrator is always on at our house. 
  

Friday, June 7, 2013

Simple and Delicious Applesauce

I don’t know about you, but my family LOVES applesauce.  I have 2 kids who would probably eat applesauce every day of the week.  

When I read the ingredients on the applesauce jar, I noticed added sugar and other unnecessary items.  So, I set out to make my own. 

Homemade applesauce is one of the easiest things to make.  The best part is there is only one ingredient.  


Step 1: Choose your favorite apples.  I love Honey Crisp apples because they are so sweet. However, they are often the most expensive apples so I mix them with Golden Delicious.  You can use as few or as many as you want.

Step 2:  Peel and core your apples.


Step 3: Place apples in big pot, fill with just enough water to cover. 


Step 4: Boil the apples until tender, about 15 min.

Step 5: Remove apples from water and place in a food processor or blender, retaining the water.

Step 6: Blend until smooth

Step 7: If desired sprinkle with Cinnamon and Enjoy!


Wondering why I said to retain the water? Easy, now you have apple juice.  You will probably only have a few cups, which should be enough for everyone to enjoy.  

If you don’t want to drink the apple juice, save it to add to baking or your morning oatmeal. If you aren’t ready to use it right away, freeze it in ice cube trays.

Monday, June 3, 2013

Hazelnut Milk


Late to the party.  That's how I felt about the almond milk fad but not anymore....

And once you taste hazelnut milk, you may never be satisfied with any other milk.


You'll need a high power blender, a mixing bowl, a strainer and a nut milk bag. Nut milk bags are finer than cheesecloth; you can use cheesecloth if you don't mind more pulp. Nut milk bags are usually found online or at local health food stores for under $10.  (These bags are also great for straining out pulp if you are using your blender to juice.)

Not sure how to identify a nut milk bag?  Here is a visual: 


I bought an inexpensive metal strainer at Garden Ridge.  If you don't want to go top dollar for one, I recommend looking at places like Garden Ridge, Big Lots, etc. 


As for the ingredients, you will need the following:

3 1/2 cups of water
1 date
1 tablespoon lemon juice
1 cup hazelnut, soaked for an hour then rinsed and drained
pinch of sea salt

Combine all the ingredients in a high powered blender.

Blend for 1 minute or until all ingredients are liquefied.

Place the strainer over a mixing bowl and line with the milk bag.


Pour the freshly blended mixture into the nut milk bag.  This will filter out the hazelnut pulp.  I usually let it drain for a while then use my hands to apply force to speed along the process. 

Place the filtered milk into an airtight container and store in the refrigerator. It should keep for 4-5 days. 

I like to use it in my coffee, cereal and baking.  Basically, anywhere you use milk you can substitute with the hazelnut milk just be cognisant of the hazelnut flavor and the sweetness of the date.  

I dehydrate the hazelnut pulp left behind in the nut milk bag then grind it into meal to use in baking and sprinkling atop yogurt.  You can also use an oven set at the lowest temperature possible with the door ajar to dehydrate.  It usually takes a couple hours.   


And there you have it... go ahead ... try it... be a trendsetter!