Saturday, September 21, 2013

The Sweet Life

It's almost a month since the last blog post.  What happened?  Life.  Admit it, you understand. Between our two families, we've had a month of vacations, family gatherings, sick kids, work, long runs and all the other adventures life tends to provide.  

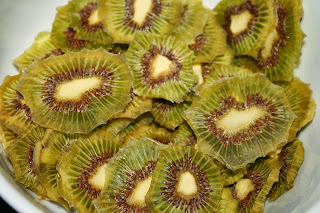
Even during the hustle bustle of life, we try our best to not let bad choices become bad habits.  It's especially easy to give into a sweet tooth by appeasing it with candy or chocolates.  Sound familiar? If so, we have a solution for you....Dried Kiwi


Step 1: Peel kiwi – Start by trimming both ends of the kiwi with a knife.  Then slice down the sides of the kiwi right to remove the peel. 
 
Step 2: Slice the kiwi – Make slices as thin or thick as you like.  Just remember the thicker the slices the longer it will take to dry.

Step 3: Places slices on dehydrator trays.

Step 4: Dehydrate at 135 degrees until desired consistency .

Step 5: Enjoy the guiltless, sweet snack.


Saturday, August 24, 2013

Steamed Ginger Tilapia

Forget about one hit wonders.  Let's talk about one pot wonders.  

No matter your lifestyle, we could all use more hours in the day.  Although a one pot meal won't add extra time to your day, it will reallocate time from cooking and cleaning to use as you choose...a quick workout, more conversation with your spouse, a little extra play time with the kid... You get my drift?   

Let me give you a visual.


Interested? 


Ingredients:

1 cup quinoa
16 oz frozen broccoli (prefably organic)
4 pieces of tilapia
2 tablespoon soy sauce
1 tablespoon toasted sesame oil
2 teaspoons ginger


For this one pot recipe, you will need a double boiler with a steamer insert.

Start preparing quinoa by adding 1 and 3/4 cup water to a sauce pan.  When the water enters a rolling boil, add 1 cup of quinoa.  (I buy pre-rinsed quinoa.  If you do not, soak, drain and rinse prior to this step.)  Cover the saucepan, turn off the heat and let the sauce pan sit for at least 30 minutes.  During this time, do not uncover or remove from the cook top.  Just go live your life and forget all about it for awhile. 

Side note: Normally, I recommend flavoring the quinoa or at least salting. In this recipe, I find mixing the fish and broccoli sitting atop the quinoa flavors it sufficiently.  

After 30 minutes, uncover and fluff quinoa with a fork. 

Now, remove the quinoa from the sauce pan, placing in a container for use in the near future.  
Quickly rinse out the sauce pan and fill with frozen broccoli, adding water until it just covers the broccoli.  Bring the water to a steady boil.  Let the broccoli cook for 3-5 minutes.   

Place the steamer insert on top and lightly spray with cooking oil.  Align tilapia in the steamer and coat with soy sauce, sesame seed oil and ginger.  

Cover and let steam for about 5 minutes.  When done, remove the tilapia and drain the broccoli. 

To serve, place a generous scoop of quinoa onto a plate and top with one piece of tilapia, adding the drained broccoli to the sides.  


Wednesday, August 7, 2013

The One

I once read when you find a perfect recipe version of a staple dish, stick with it.  Don't keep trying to improve it.  Well, ladies and gentlemen, today I have found the one.  Oddly, it isn't even my own creation but it's too good not to share. 

For some time I've been working on perfecting a marinara sauce recipe.  I played around with different additions to sweeten and give it a standout taste.  I tried roasted red peppers then I replaced those with honey before moving onto dates.  I finally stumbled upon carrots. They were perfect, adding just the right amount of sweetness and depth.  But, the recipe still wasn't there yet.  

One day I stumbled across a tomato sauce recipe by Mario Batali in Food & Wine magazine. I was surprised to see that his recipe used carrots to sweet the sauce.  Who would have guessed... Mario Batali an American chef, writer, restaurateur and media personality and myself, mom, wife, worker bee, took a couple cooking classes at Sur La Table, would have the same idea. Of course,he pulled it off a little better than me... this time. 

Today, two things happened that motivated me to try Batali's recipe..... 


I received these unique looking carrots in my Wednesday produce delivery.


And, then I noticed the thyme plant in my herb garden is taking over; thanks to an extra wet spring.  


I tried the recipe, it was PERFECT.

For my perfect sauce, I've changed a few of the ingredient amounts but the heart of the recipe is Batali's.  It's really too good not to share......

Ingredients:
1/4 cup extra-virgin olive oil
1/2 large onion, finely chopped
4-6 garlic cloves, thinly sliced
1/4 cup finely shredded carrot
1 tablespoon fresh thyme
Two 28-ounce cans whole peeled tomatoes with their juices, crushed*
Salt

*I buy whole canned peeled tomatoes and work the whole tomatoes with scissors while still sitting in the juice in the can.  And, then I use a potato masher on any large ones that I see once transferred to the saucepan. 

In a saucepan, heat the oil until shimmering.
Add the onion and garlic and cook over moderate heat, stirring, until softened and just starting to brown, 10 minutes. 
Add the carrot and thyme and cook, stirring, until softened, 5 minutes. 
Add the tomatoes and their juices and bring to a boil. 
Simmer over moderately low heat, stirring, until thickened and reduced to 5 cups, 30 minutes. 
Season with salt to taste.

Saturday, July 27, 2013

Having it your way.... Eggplant

Life is a never ending spin cycle. Sometimes there is a slight pause to ensure a properly balanced load, but the rest is brief and soon life is spinning again.  

We try to have lots of fresh fruits and vegetables and other wholesome staples on hand to make dinner decisions easy and healthful. This year, we enrolled in a produce delivery service. The suppliers are all local farms; hence the deliveries are seasonal and local.  It differs from a CSA whereas we select from several pre-bundled choices each weekend with delivery following in a few days.  It's a great education for the entire family.  I've learned about effects the extremely rainy spring and summer has had on various crops.  The kid was enlightened and amazed to find that an ear of corn hid beneath a mysterious green husk.  It may sound like a luxury but it has saved us time and money.  Plus, we are supporting our local economy.  

We received another eggplant in our selection last week.  After reading about them many times over the years, I decided to try a variation of an eggplant round/pizza recipe. My challenge was to make it appealing to the entire family while using up existing ingredients. I ended up with three versions: kid-friendly, vegan and mainstream.   

The results....delicious....and so simple a detailed recipe isn't needed

W

Set the oven to preheat at 375.

To prepare the eggplant, slice (about 1/2 inch), single layer on a metal pan and salt lightly. After about 5-10 minutes, place a paper towel over the eggplant and apply pressure to absorb some of the water. Flip and repeat.  

After the oven preheats and then some,bake the naked eggplant rounds for 15 minutes.  

Remove the eggplant and top the rounds with your favorite flavors.

As a base for all three versions, I used organic canned tomato sauce topped with fresh basil leaves, fresh oregano and minced garlic.  


The kid friendly rounds received a simple topping of shredded mozzarella.  

For the vegan crowd, the rounds offered Daiya (mozzarella style.)

The third version was topped with mozzarella and a generous helping of ricotta.  

After applying toppings, bake for an additional 5 minutes.  Until cheese is melted.....


Tuesday, July 23, 2013

Eggplant Rounds

Summer has only just begun; yet the end is already in sight.  

Go ahead and partake in some summer fun. 

We have already planned dinner for you.  

Ingredients:
1 large eggplant, sliced into 1/4-1/2 inch rounds
8 oz package frozen spinach, defrosted and drained
2 tortilla wraps
2 garlic cloves, minced
8 oz package of baby bella mushrooms, wiped clean and sliced
½ tomato, seeded and diced
¼ cup of your favorite cheese I used an Italian blend.

Preheat oven to 350 degrees.

Place eggplant in a single layer on a baking sheet, topping with mushrooms.  On another baking sheet, align the tortilla so they are not touching. Bake both pans for 15 minutes; rotating oven positions once. 

While eggplant and mushrooms are baking, combine garlic and tomato in a small bowl. 

Remove both baking sheets.  Divide the eggplant between tortillas and top with tomato and spinach.  Finish with a layer of cheese

Bake in the oven until tortilla is crispy and cheese is melted; approximately 10 minutes. 

Tuesday, July 16, 2013

Chicken and Quinoa

Dinner in a flash.....of a skillet.

After a busy weekend, Monday arrived way too early.  That night I struggled to find an easy dinner that didn't involve microwaving a bag of popcorn.  After a search through the pantry, fridge and freezer, here's what happened:


Season a couple of uncooked chicken breasts with smoked paprika and a pinch of salt. 
Add a couple tablespoons coconut oil to a warm skillet.  When the coconut oil becomes liquid, add 3 cloves of minced garlic.  
When garlic becomes fragrant, add chicken.  Cook until completely done (165 F); turning once half way through.
When done, remove chicken and cut into 1 inch cubes. 


Place a ladle sized scoop of cooked quinoa on a plate.  Top with diced chicken.  Garnish with avocado, tortilla chips and hot sauce. 

And this is why one should always have cooked quinoa on hand and leftover chips from the burrito joint.  


Friday, July 12, 2013

Meatballs

I made one mistake with this recipe last time.... making only one batch.  
I was hoping to have leftovers for lunch the next day, but I was robbed.  My kids asked for seconds; a rarity. I am pretty sure they didn’t touch the accompanying spaghetti on their plates.   
1/3 cup onion, diced
1 clove garlic,  minced
1/4 tsp ground pepper
1/8 tsp thyme
1/4 tsp oregano
Saute above in 2 tbsp olive oil, water or vegetable stock for about 7 minutes.


8 oz spinach
1 ½ tsp of Worcestershire sauce
Add to onion mixture and saute for 2 minutes, until spinach is wilted
Remove mixture from stove and allow to cool


1 lbs of ground beef/turkey
1 egg
¼ cup bread crumbs
Combine in a medium bowl until fully incorporated.  (I find mixing with my hands is easiest.)


Combine onion mixture to beef mixture.

Form balls and place on pan covered with aluminum foil
Bake 400 degrees about 10 min (depending on how big you make the meatballs)
Remove from oven and enjoy.
The best part of meatballs is their versatility.  Place on a sub roll and top with cheese and marinara for a meatball sandwich, serve alongside spaghetti, serve alone as a party appetizer or save them all for yourself.
Don’t forget to make a double batch, you can always freeze any leftovers.

Monday, July 8, 2013

Beans and Ginger Rice


Beans and rice.....Together they are economical, easy, plentiful and delicious.  Did I mention versatile? Sprinkle a little cheese on top and kids eat it up.  Foresee a busy week; cook up a batch to pack for weekday lunches.

Before the recipe, let's talk about the beans.  This recipe calls for black beans. I typically buy organic, dried black beans in a 16 ounce / 1 pound bag.  If you have never worked with dried beans, they are really simple.  After dinner, pour the entire bag into a glass bowl, cover with cold water (about an inch or so above the beans) and let soak.  The next morning, rinse and drain the beans. Place the beans along with 6 cups of cold water in a pot on the stove and bring to a nice simmer.  Let the beans simmer for about 45 to 90 minutes, stirring occasionally and adding water as needed.  When fully cooked, the beans will be soft but not mushy.  When the beans have this consistency, drain and let cool.  At this time, I divide 1 cup portions into freezer bags and place extra in the freezer for future use.  

For this recipe you will need:

3 tablespoons olive oil
2 1/2 cups of black beans, fresh, frozen or canned (If using canned, drain and rinse.)
1 cup brown rice
1/4 inch fresh ginger root - peeled and grated
4 cloves garlic, minced
1 teaspoon cumin
1 teaspoon coriander
3 cups water (to start)

Heat 2 tablespoons of olive oil over medium-high heat.  

Add 2 cloves garlic and let saute until fragrant, approximately 3-4 minutes.  Then add the ginger. After a minute or two, add the rice; stirring to coat. Pour in 2 cups of water. Let simmer, stirring occasionally, until the rice is fully cooked.  During cooking, add water as needed.  

In a separate pot, heat the remaining tablespoon of olive oil.  Add 2 cloves of garlic; after another 3-4 minutes add the cumin and coriander and beans (in that order.)  Add one cup of water, simmer for 10 minutes.  

When rice is fully cooked, fluff with a fork.  Place one serving of rice in a bowl, spooning bean mixture on top.  Add garnishments of your choice, such as avocado, cilantro, cheese and/or Greek yogurt. 


Thursday, July 4, 2013

Haystacks

Happy Fourth of July!

Looking for a quick, easy dessert to take along to that cookout?  Well, we've got just the one...

Haystacks!


This recipe is so easy and will satisfy even the most finicky sweet tooth.  It was born out of a desire to satisfy the family's sweet tooth in a sweet but wholesome chocolaty manner.  

When I was a teenager, I always reached for sugary candies.  During my first pregnancy, my sweet tooth evolved and became all about chocolate.  On a mission to sate my craving evolution, this recipe was born. 

Here's what you need...

2/3 cup unsweetened cacao powder
½ cup 100% pure maple syrup
¼ cup coconut oil, warmed to liquid
1 tsp vanilla extract
2 cups shredded coconut

Blend cacao powder, maple syrup, coconut oil, and vanilla until smooth.

Place shredded coconut in a mixing bowl, add chocolate mixture and combine until coconut is covered.

Line a baking sheet with wax paper.  Using a spoon, scoop individual haystacks onto the wax paper.  

Freeze until ready to serve (at least 30 minutes.)


Friday, June 28, 2013

Saute Vegetables with White Bean Mash


I was in the book store one day looking through some cooking magazines trying to get some ideas when I ran across a recipe that I thought looked really good.  I really didn’t want to buy a magazine for 1 recipe so I read it a few times in hopes that I would remember it enough to be able to cook it.  You guessed it, I didn’t remember it when I got home.  I only remembered some of the ingredients so I had to make up the rest.  That is how this recipe came about.


Ingredients:
½ red bell pepper, sliced
½ green bell pepper, sliced
½ small onion, sliced
1 small zucchini, sliced
2 cloves garlic, minced
1 tbsp olive oil
1 can  cannelloni beans, drained
1 can butter beans, drained
Juice from ½ lemon
Salt and pepper to taste

In a pot add the cannelloni beans and butter beans to warm.

Meanwhile, in another pan add olive oil, garlic, red and green bell peppers and onion.  Saute for about 5-7 min.  Add in zucchini and lemon and saute for another 3-5 min.


Once beans are warmed mash, with a potato masher or with a mixer, until creamy.  You may need to a tbsp of water at a time if too thick.  

Place a large spoonful on the plate and add the sauteed vegetables on top.

Salt and pepper to taste.

**In these pictures I used a different variety of butter beans because that is what I had on hand at the time. so the pictures may look a little different than how yours will turn out.


Tuesday, June 25, 2013

Kickin' Kale Chips

You like them. You love them. You want to eat some more.  


Kale Chips

In recent years, kale has gained in popularity.  And, there is no better way to consume kale than in the form of kale chips.  Find your perfect recipe and soon you'll be doubling and tripling the recipe to always have them on hand.  

Presented below is a recipe that I've worked on for awhile.  Initially, I started preparing kale chips coating only with oil, sprinkling with salt and baking in a low temperature preheated oven.  I've come a long way since those days, using a dehydrator and attempting to capture a melody of sweet and spice and everything nice.  

Here's my favorite recipe....which I affectionately call Kickin Kale Chips


Ingredients:
1 bunch of kale (de-vein, chop and scrunch)
2 tbsp coconut oil (melted)
1 tbsp lemon juice
2 tbsp honey
1/4 tsp salt
2 drops liquid smoke
1/4 tsp smoked paprika
1/2 tsp chili powder
1/8 tsp red pepper
2-3 cloves garlic (minced)


Combine all ingredients in a large mixing bowl
Place kale into the bowl
Work with your hands until all pieces of kale are coated
Place kale in a single layer on a plate covered with a paper towel and let sit for a couple minutes to remove any excess liquid
Move kale into a dehydrator tray in a single layer

Dehydrate at 160 for an hour then lower to 135 for 12 hours or until crunchy.

Friday, June 21, 2013

Peppery Squash Chips


Today, we have another dehydrator post.  This one features a warm weather favorite yellow squash.


Ingredients:

1 medium yellow squash
1/2 tbsp olive oil 
salt
pepper
small food brush

Slice squash extra thin
Place slices in a single layer 
Brush each slice with a dab of olive oil
Salt and pepper
Turn over each slice and repeat
Place in a single layer on a dehydrator sheet
Dehydrate until crunchy (About 6-8 hours at 160)


Monday, June 17, 2013

Banana chips and a couple of her friends....

We've all seen the marketing of the super fit person, standing atop a mountain, snacking on granola and dried fruit.

However, few of us in our adult life have a level of cardiovascular activity to justify eating the high sugar content in most prepackaged dried fruits.  Sure, our kids may reach those activity levels but even then we don't want them mindlessly snacking on sugar laden dried fruits.

Here's my solution....


Dehydrated banana, pear and apple chips:

Here's what you need:
  • Lemon juice 
  • Apples
  • Bananas
  • Pears
  • Dehydrator

Pour the lemon juice in a mixing bowl; about 1 cup.

Peel, core and slice the apples and pears

Peel and slice the bananas

Place fruit into the lemon juice and let sit for about 4-5 minutes.  I typically work with the apples and pears first, letting them sit in the lemon juice while I peel and slice the balance.  With the bananas you will want to work quickly, placing them in the lemon juice as soon as possible.

Drain from the lemon juice and place on a dehydrator tray.


Start dehydrating at 145 or higher for the first two hours.  Then reduce the temperature to 135 and continue dehydrating for 12-24 hours depending on how much 'crunch' you desire. 


Friday, June 14, 2013

Smoky Eggplant


As promised, here is another dehydrator recipe to help you battle the summer heat by not having to preheat your oven.  This one focuses on eggplant; specifically the most commonly found large, egg-shaped purple eggplant.  

Fun facts about eggplant:  

  • Closely related to potatoes and tomatoes. 
  • Classified as a nightshade.
  • Often used as a meat substitute in vegan and vegetarian cooking
  • Is delicious

Ingredients:


2 cloves garlic, minced
1 eggplant, sliced horizontally and salted (After slicing place the eggplant in a single layer and salt lightly, this will aid in combatting the natural moisture of the eggplant.)
1/4 cup olive oil
2 tbsp tamari sauce
2-3 drops of liquid smoke
1 tsp chili powder
1/4 teaspoon cinnamon 
2 tsp maple syrup


In a large mixing bowl, combine all ingredients. 

Dredge the eggplant through the mixture, lightly coating both sides. Careful to let any excess drip off. 

Place into dehydrator in a single layer. 


Dehydrate at 135 for approximately 8-12 hours; until desired crispiness. 


Smoky eggplant makes a great vegetarian option to bacon.  Crumble it up and place atop salads.  Use it on a vegetarian style BLT.  Get creative!  

Tuesday, June 11, 2013

Coconut Cinnamon Balls

When the heat and humidity of summer arrives, a dehydrator is one alternative to an oven for food preparation and snacks. 

A food dehydrator removes moisture from food, aiding in preservation.  The appliance accomplishes this by using a heat source and air flow.  Dehydrators come in a range of options and price points.  They are readily available from a variety of brick n mortar retailers, as well as online.   

I'm using a Nesco American Harvest dehydrator.  With the humidity peaking in the southeast, my dehydrator has been in use all weekend.  So, expect several dehydrator recipes in the coming weeks.  

The first in the series of dehydrator recipes is Coconut Cinnamon Balls, 
inspired by the popular Larabar.  These balls are a great snack option for so many reasons; they are vegan, and gluten free, as well as nut free.  These snacks don't require refrigeration; so they are great to keep in the car, purse or desk drawer.   

Dates are the basis for these coconut balls.  If you haven't used dates before, you will be surprised at their natural tastiness.  They are packed with antioxidants, naturally sweet, a great source of fiber and provide many minerals such as calcium, magnesium, zinc, manganese, copper, iron, selenium and potassium.  Many refer to dates as nature's candy. 

The version presented below is in ball (versus bar) form.  This was only to save time.  The same recipe can be spread into a square pan on parchment paper.  If you choose the bar method, I recommend refrigerating the pan for a couple hours prior to scoring into bars and placing in the dehydrator. 

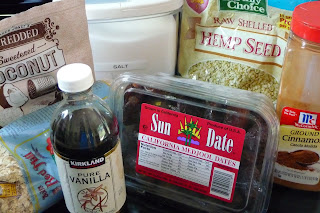
Ingredients:

1/4 cup hemp seeds
1/2 cup rolled oats 
1 tsp cinnamon
pinch of sea salt
1 cup pitted dates
2 tbsp shredded coconut
1/2 tsp vanilla


Place the hemp seeds, rolled oats, sea salt and cinnamon into a blender or food processor. Work them until the ingredients are chunky like shown below:


Add the dates and vanilla to the mixture.  Continue to process until a ball forms.  Then toss in the coconut shreds, processing for 15-30 seconds additional. 

Remove mixture and form into balls.

Place into a dehydrator.  Dehydrate at approximately 135 for 8-12 hours.  


This recipe leaves itself wide open for variations.  Not a coconut fan? Leave it out.  Have a love of pistachios?  Toss some in during the final 15-30 seconds. 

If you discover or already have a favorite combination, leave us a comment.  The dehydrator is always on at our house.